machine knitting midgauge standard bulky machknit knit machine-knit patterns

Friday, December 31, 2010

Machine Knit Puppy Sweater

Well, I guess this is the last post of the year. I have knit a lot of stuff in 2010! I wonder if I'll match the amount in 2011. I suspect so---the addiction shows no signs of waning. Anyway, to my readers I wish you a Happy New Year!

We spent Christmas with our daughter in California. We were hoping to get some sun and warmth, but the weather was pretty awful. Her new puppy was shivering in the cold the whole time we were there, so I thought I'd knit him a sweater. The dimensions are hard to figure out even with measurements. She'll just have to try it and let me know what needs to be adjusted. The pattern is from the Caron website---called the Rainbow Pooch Sweater. You can find it at http://www.caron.com/projects/br/rainbow_pooch.html

It's a hand knitting pattern that I found easy to translate to machine knitting. I made the smallest size on my Silver Reed 860 midgauge with a single strand of Simply Soft. I followed the pattern fairly faithfully. Viewed from the side:
And, also viewed from tummy side
Oliver is a miniature dachshund. Cute as a button and full of personality. Never thought I'd knit a sweater for a dog, but there it is.

On to other things in 2011. That's going to be hard to get used to saying. Always seems to be the case...

Monday, December 20, 2010

Machine Knit UFO morphing to FO


Those who know me are aware of the fact that UFO's (unfinished objects, not the alien types) don't sit well with me. Can't stand to have something in the closet that isn't finished. This one has to be a record for me having sat around for 2+ months. I started this at a machine knitting retreat in October, wasn't sure I liked it, then decided yesterday to finish it. All I had left to do was the wide shawl collar. Easy enough for a machine with a ribber.


The pattern is "Kyra", a free pattern obtainable on the Berroco website. It was easy to convert from hand knitting to machine knitting. I changed the cuffs and bottom hem to Mary Anne Oger's stockinette, no- roll hem, which I love. It's a little hard to see because of the variegation in the yarn. I also love the asymmetrical aspect of this sweater, the shaping at the sides and the huge shawl collar, which I had to knit in two sections in order to have enough stitches.


I knit it on my Silver Reed 860 midgauge with ribber (the ribber was needed only for the collar). The rib isn't exactly like the rib in the pattern. A person could knit the sweater on the machine and then knit the collar by hand, but I don't have that much patience. Actually, I have to say the 860 does make nice ribbing. The yarn is Conshohocken cotton (lovely soft stuff) that I hand dyed. I knit up 3 large blanks and painted them with Dylon in wide swaths so the color repeats would be long. I machine washed and dried the blanks so all the shrinking is done. Some people think this is a lot of work, but the fact that the garment won't shrink appreciably is worth it to me. I unwound the blanks into balls and knit from there. I didn't make any attempt to match up fronts with the back and didn't try to make the sleeves match either. Artistic license, I guess.

It's for my daughter. Don't know if she'll like it at all, whether it will fit her or how the closure should go. Guess I'll just have to wait a week or so.

Saturday, December 18, 2010

Machine Knit Christmas Idea


Wanting some little extra Christmas items, I decided to make some table protectors/ hotpads/ trivet kind of things. I have a boat load of cotton yarn, so there is plenty of pretty red and white to use up. I used DesignaKnit to borrow motifs from various patterns I've stored. Mostly Dale of Norway Norwegian sweater hand knitting patterns that I've purchased. Any 24 stitch punch card or other electronic pattern could be used. Mine ended up to be about 8" x 8" give or take. You'd have to experiment a little with your yarn, if you want to try making some. I'm just partial to all things Norwegian, hence the Nordic look. And, can you tell that red is my favorite color????

They all are made of 3 strands of 16/2 cotton each color and my Brother 970 standard gauge electronic to which the patterns are downloaded. They are all close to 73 st wide x 91 rows long (182 doubled) to make a square. Different yarn would need to be experimented with (swatched) to produce a more or less square hotpad.
I started and ended with waste yarn, then the main pattern. The pattern is repeated twice lengthwise, folded and (off the machine) kitchener stitched together from the purl side so that both ends look pretty much the same. Turn the thing right side out and then sides are mattress stitched closed. I added a 50 row I cord to one corner just in case a person would want to hang one on the handle of an oven.

They seem to be pretty heat-resistant, but for extra protection a good idea is to put a square of heat resistant fabric in the middle before seaming it shut. (I can't remember what that stuff is called, but it has some metal like fabric with mesh on both sides. Quilted ThermaFlec Heat Resistant Fabric??? Something like that. )

It has been the perfect mindless project for me after knitting 29 ski hats and headbands for a local high school ski team. Am I ever glad that's done. Here's the hat, guys' headband and girls' headband. The school's logo includes an anchor since Minnetonka is a huge local lake. The suburb is named Minnetonka, as is the high school. I think the lake came first then the town, but I'm not sure. Anyway, knitting for profit rather than fun takes the joy out of it....until next year. The team mom promised a picture of the kids. Hope she remembers.

By any chance, did you notice that I've knit almost 20 miles worth of yarn this year? It's probablly more, because I forgot to record some of the things I knit. Pretty impressed with myself!

Thursday, December 9, 2010

Free machine knitting pattern for an easy scarf - "The Stripster"


Here's an idea for an easy, last minute gift. It's a quick knit, can be done with any yarns and any machine. Could probably be easily knit by hand too -- but why spend days when you can get this one done in short order? My vote goes for machine knitting any day for sure.
Machine: Any
Yarn: Any- is a good pattern to use up yarn, but different yarns should be the same weight for smooth joins.
Gauge: I used largest tension on a midgauge with medium worsted wt yarn (4 colors of Caron Simply Soft) to get nice drape. Do a swatch or two to get the best gauge for your yarn. My gauge was 4 stitches and 4.6 rows to 1” on the midgauge.
Finished size: 11” wide (fully stretched, but it rolls in and scrunches up) x 5.4 ‘ long to wrap around the neck once and knot somewhat like an ascot. The end knots take up (shorten the scarf) about 2” each end.

The idea is to knit strips and attach strips as you knit. You can reverse the purl and knit side for each strip or keep the knit sides all the same and the purl sides all the same. You leave 40 rows unattached each end and knot for a “fringe”. Changing colors each strip, changing colors mid-strip or using hand dyed yarn would all give a nice effect. Knit time is about one hour!!! 4 skeins of Simply Soft will make 2, possibly 3 scarves. Normally I'm not too crazy about acrylic, but this brand is soft and I'm not sure whether the intended recipient likes wool or not.

DIRECTIONS for Midgauge (adapt for standard or bulky doing a little math to get the size you want):
Strip 1- Ewrap cast on over 10 needles. RC 000. T 10 knit one row, hang claw wt. Knit to RC 40, hang a marker. Knit to RC 260, hang a marker. Knit to RC 300, bind off. (Move wt up as you knit.)
Subsequent strips- Ewrap cast on over 10 needles. RC 000. T10 knit one row, hang wt. Knit to RC 40. With right or wrong side facing, begin hanging previous strip at the point of the first marker onto the leftmost needle of the new strip. *Hang a loop from the old, K 2 rows.* Continue from * to * until RC 260. Knit without attaching to RC 300, bind off. (Move wt up as you knit.)  Repeat from  to  for as many strips as you want the width.


For the midgauge I found that 4 strips made a nice width. For the standard I did 7 strips of I cords (the row count was also different. See Knitwords #53 for the pattern. Still available for purchase from the Knitwords website.) Pictured below, a little different effect but same principle of assembly.

Finishing: Run in the yarn ends, remove markers. Tie a knot at the very end of each strip. Voila’, you are done. Probably no need to steam. You don’t want to flatten out the knots.

Tip re hanging stitches: You want the loop not the knot on the edge of the previous strip. Once you get going, the previous loop will be stretched out. You don’t want that one again. Look above the stretched out one for the tiny knot and above that will be your next loop to hang. Keep unfolding the edge with the fingers of your left hand so you can see the loops and knots.

Saturday, November 13, 2010

Winter has arrived!


Our first snow of the season and it's a doozy. It's thick and heavy due to the relatively warm temps. We were supposed to have knit club this morning, but the roads are too treacherous.

There is one among us who is in 7th heaven, however. Hard to get her to come back into the house. She makes me laugh. She sticks her nose down into the snow and runs! Just like a mini snow plow.


It's a good day to snuggle in and knit.

Tuesday, November 9, 2010

William Morris is hanging around my neck...


I am a cowl convert. It seems if your neck is warm, so goes the rest of you. There was a time when I couldn't stand the extra heat, but now am finding I need it.

I was inspired by this cowl from Berroco's free patterns. If you'd like to see the original pattern, you can find it here:
http://www.berroco.com/exclusives/winterfloral/winterfloral_1.html
I liked the concept but not the design. I found a William Morris wall paper I liked, converted it to knit stitches in DesignaKnit and knit the cowl on my Brother 970.
It's a rectangle 28" wide by 18" tall. I doubled it over so that the height is 9", and I positioned the seam at the bottom. Some of the images you convert to knit patterns have long floats between motifs and, although they might be lovely, are not very practical. The nice thing about this method of making the cowl is that all the long floats are enclosed when you seam it. Steaming takes care of smoothing it out. Just for added interest, I put a small red stripe on each end. Both ends have 2 x 2 ribbing; one side has 3 button holes. Found some vintage-looking buttons for it. The yarn is Forsell's Pure New Wool, T 7, 7 st x 9 rows=1". Very soft and warm. You could easily make it with your own design or one that is built into your machine subbing your own gauge. Really simple and fast.
Closeup of the back side:

Nice, eh?

Thursday, October 28, 2010

Free machine knitting patterns linked to posts

Suddenly the file storage site I've been using, which has been happily free for a couple of years, is sending out something foul. My Norton's antivirus says it's an attack site. Who would know the reason why???? So I spent some time linking all my free patterns back to individual posts about them and included the patterns there rather than having you download pdf's. I sure don't want to be responsible for someone getting hi-jacked or infected with a virus.

So much for free stuff. I keep thinking there is no free lunch...

Tuesday, October 26, 2010

Men's Garter Carriage Scarf


Katherine sent me a picture of her Men's Garter Carriage Scarf. (This pattern, with the errors fixed, was mentioned in my last post.) It's beautiful! And, her husband likes it. Not an easy accomplishment.

At our guild's "knit-in" last weekend, I concentrated on knitting hats toward my birthday goal. Only got 3 done. At this rate, it's going to take a while...
I did the pattern for the midgauge earflap hat and the one for the beanie that are available here on my blog. Scroll down on the right side. These were knit on my portable KX 350, so any midgauge machine should work fine. I used 2 strands of a thinner acrylic yarn. And you can't tell that either of those cones has gotten any smaller!


Looks like teal is the color of the day.

Sunday, October 24, 2010

Correction to garter carriage scarf pattern

Friend Katherine was kind enough to write me and tell me the free garter carriage men's scarf pattern had some errors in it. So, if you downloaded it previously, you may want to download the corrected version. Scroll down towareds the bottom right side and click on the drawing of the DAK file. Whew! What was I thinking? I actually did make it a couple of times and never noticed the errors. I think because the stitches are tiny, they are easy to miss. Excuses, excuses. Hopefully it's error-free now.

Wednesday, October 20, 2010

Name change

Ok, changed the name on Ravelry to "Dangling Daisies" and will obliterate all references to you-know-what on the blog.

Correspondence regarding name of toddler hat...

Hi Mar,
You might want to change the name of the toddler hat…
http://www.thefreedictionary.com/dingleberry
din·gle·ber·ry (dnggl-br)
n. Vulgar Slang

A piece of dried feces caught in the hair around the anus.

An incompetent, foolish, or stupid person.

I didn’t have a clue what it meant as slang either until someone pointed it out to me.

BTW, it is really cute!
Justina

OOOOOOOOOOOOOOOOOOOOOOOOOOOOOOOOOOOOOOOO

Yikes!
I guess I will change the name. I just thought it sounded cute. Maybe not. Thanks for pointing it out to me. Was blissfully unaware.
Mar

OOOOOOOOOOOOOOOOOOOOOOOOOOOOOOOOOOOOOOOOOOOOO

Any suggestions? Dangling Dandylions? Downward Daisies? Swinging Snapdragons?

Sunday, October 17, 2010

Free Machine Knitting Pattern for a Toddler Hat


It's been a long time since I entered anything in my blog! Time to get back into machine knitting. A challenge has been put forth in my machine knitting circle to knit ourselves a birthday present this year. That is, we are to knit one charity hat for each of our years on Earth. For some of us, that's a real challenge! I'm plugging away at it and have 5 done so far this month. Suffice it to say, I have many to go...

Here's the hat I knit today. It's really easy and fast. Just to keep it interesting, each of my hats will be different. I'm not so good at production knitting, I guess. Here are the directions.
Dangling Daisies Hat for a Toddler
Machine: Standard Gauge 4.5 mm, with ribber or garter carriage
Yarn: Any that knits to gauge
Gauge: 8 stitches x 11 rows = 1”
Finished size: With brim folded up, 7. 5” tall x 8.5” wide to fit a 2-4 year old
Directions: Cast on for 1x1 rib over 141 stitches. T 0/0 knit selvage 3 rows. (Refer to your manual.) T 2/2 K 40 rows. Transfer stitches to main bed, T 6 knit 70 rows. Knit waste yarn for several rows. Remove from machine, fold so right sides are together. Hang 2 matching stitches (front and back) together across the needle bed, and bind off around gate pegs. Seam side seam. Pick up 4 stitches at one corner at the top. Set machine to slip one way, knit the other way for I cord. Weight knitting with your hand. Knit 42 rows for stem. For petals,* knit an additional 40 rows, count back 20 rows, pick up and hang whole stitch on one of the middle needles. * Repeat from * to * for 4 more petals. Bind off. Make stem and petals on other corner. For flower, omit stem, ewrap cast on over 4 needles. Knit 5 petals, attach securely to ribbing. Hide all yarn ends and neaten the petals if necessary.

Fast, easy, cute, and silly! More hat patterns to follow. Stay tuned!

Saturday, May 1, 2010

Knitwords 53 is out!


Now that the latest issue is in the mail, I thought I could post a picture of my contributions. Due to space restrictions, they ended up as black and white, not as appealing I'm thinking. I really had fun making these scarves and the shawl. Dying the yarn is half the fun. Now I also get to add these seven to my knit total. Miles and miles of yarn!

I really like a lot of the sweaters in this issue. Nancy Roberts' cover sweater and Alice Tang's shrug are my personal favorites, but there is a lot to choose from. Hope you are a subscriber---you won't be disappointed. Check out the issue at http://knitwords.com/

Friday, April 30, 2010

Purls of Joy, a bad mistake and a machine knit tuck blanket

Wow, can't believe it's the last day of April. Time seems to fly ever faster and faster as a person gets older. Like how a roll of toilet paper disappears. Slow at first, then so fast that next time you look it's time to replace it. Elegant comparison, no?

The Purls of Joy seminar held a week ago in Minneapolis was great fun. It was the first time I had ever demonstrated so I didn't really know what to expect. I did 3 classes on DesignaKnit. One was an overview of the various parts of the software, one was on using text and one was on custom sizing. I sold a disk entitled "Doing DAK", a book I have written. It was well received. When I get additional copies made I'll offer it for sale here. There was a good variety of classes put on by the guest demonstrators and machine knitting dealers. The other guest demonstrators were April Mills, Teena Crawshaw, Pamela Pommerenke, and Carolyn Barnett. I got to meet two Ravelry friends in person: Elaine and Joey. Many of our guild membership were there. Got to talk with some people whose faces I recognized from years past. Too bad it's only once a year. I really enjoyed it.

However. I was exhausted when I got home and it took several days to recover. Feeling ok now. So, this afternoon I decided to knit a lap robe for donation. I was horrified to discover that I had left my CB1 on (the computer part of my 970). And it had to have been left on for 10 days. Grr. I was unbelievably mad at myself. Understatement. I think it will be ok, though. I do know one mker who left her machine on for a year when she was in the middle of a baby blanket. I think it was a garter carriage blanket. She was afraid if she turned it off she'd lose the pattern. Compared to that, 10 days isn't so bad. And I always (!) check to see if it's off when I leave the room. Chalk it up to old age, I guess.

Anyway, I did manage to knit a tuck stitch lap robe. I am still using up yarn so I decided to try "plying" two thin yarns together. Have never done that before. Here was my setup:
You can't see the two yarns at all coming out of the top (bad photo) but you can see the thicker white yarn in the cage with the second yarn on top. I threaded a needle with the white yarn, passed it up through the milk crate and dropped it through the gray cone on the top, then set the gray back right side up, threaded both yarns through the same eyelet on the yarn mast. It worked well. Wasn't as variegated as I thought it would be, but I didn't get the distinct stripes that you get when you just thread them up.

This is the pattern I used. Write to me if you have DAK and would like the complete blanket. The blanket including borders is 192 st x 460 rows. The stitch repeat, which would be suitable for a punchcard is 24 st x 60 rows. What surprised me was the texture the pattern produced. I expected the predominant thing would be the hearts. Instead these arrow head shapes are what you notice most. Never does a scan or photo do knits justice. Here's the border:

Feel free to copy the punch card. You'd need to figure out a border so it doesn't roll. And, like I said, if you want the .pat or .stp file, let me know.

Friday, April 16, 2010

Making your own variegated yarn


What do you get when you combine a slubby multicolored thread- thin yarn with a cream color (boring) thread- thin yarn? Something a little more interesting. Both of these are additional monster cones I'm trying to use up. I think I'll be able to get a lot more scarves out of this combo. It really is a lot more fun than either yarn by itself and it will go with coats of different colors.

I did 60 stitches and 810 rows of Fisherman's rib, T 3/3. The scarf is 7" wide and 56" long. Might be about the right size for a grade school child. Hope I burned up a few calories anyway.

Thursday, April 15, 2010

What a 10 lb cone of chenille looks like...


I tried to take pictures of this humungus cone of yarn. But it's really impossible to show how big it is. Next to it is a 2 lb cone of woolray for comparison. Keep in mind also, from it already has come one shrug for a teenager, one shawl 3 ft x 7 ft (the disaster one) and one scarf 8 inches x 6 feet. The original cone was so heavy it caved in the thick cardboard inner cone.

I suppose this is what the cones look like in a knitting factory. Could an ordinary home knitter ever use up something like this? I wonder...

Chenille Success


There was a discussion on Ravelry today about the difficulties knitting with chenille. So I remembered that I forgot to post (and count!) my chenille scarf. I inherited a huge cone of yarn from my friend Dee. It is not the sweetest thing in the world to machine knit with. I did manage to get this charity scarf knit last week. I used my bulky machine with ribber, 40 stitches, T6/6, 1 x 1 rib for 300 rows. It ended up being about 6 feet long and 8" wide. Running serger thread along with it helps keep it from biasing.

I had made a scarf last winter with this yarn and washed it with disastrous results. So, maybe it's not nice, but I'm NOT washing this one. It is soft and is such a pretty color!!! Hope some child can make use of it.

Monday, April 12, 2010

Single Bed Tuck Baby Blanket


This is one of Charlene Schafer's Easy Tuck Baby Blankets. I used a pale green cotton, which is nice yarn, but am having a little trouble with curling edges. I haven't laundered it yet, so maybe the edges will behave better after washing and drying. Not going to spend the time crocheting around the edges. If it stays like this, it's not a disaster.

I like the tuck pattern--it looks like little bow ties inside of the diamonds. And in person, the texture is really nice. When the needles tuck more than 2 rows, the stitches really stand out, as in the lines for the diamonds.

After I downloaded the DAK pattern to my machine it took me 1 1/2 hours total knitting time. Love that! And another 1,000 yards to my total for the year.

Friday, April 9, 2010

Full Needle Rib Tuck Stitch scarf


I took Diana Sullivan's advice and tried a full needle rib tuck. Isn't this pretty? I used her example from Stitchworld. Easy enough to enter into the machine. Didn't check to see if it was in my Stitchworld III book because it only took a minute to enter the 8 stitch 7 row pattern. Here it is on Diana's blog:
http://diananatters.blogspot.com/2010/04/tucked-ribbing-ideas.html

This is some thread-thin mill end stuff, probably acrylic. But it's really soft when knit up and thread-thin worked fine for this scarf. It has a dressy look to it and is as light as a feather. What I like is that both sides look really similar. You'd have to study hard to distinguish one side from the other. I also liked the borders on the sides that it automatically made. And they don't roll. This color wouldn't be the best on me but maybe would work for someone else. Unfortunately, I don't think I can dye it.

Here are directions in case you want to make a similar one. I cast on 40 stitches in full needle rib at T 0/0. Did the circular cast on, knit 10 rows at T 1/1. Then I transferred stitches according to Diana's pattern, putting every 4th needle out of work on the main bed. (Those are the stitches that were transferred to the ribber.) Then I did my KC row to select needles, turned on the electronics, pushed in my tuck buttons and knit 500 rows. At the end, I switched back to fnr (every needle in work both beds by borrowing purl bumps to fill in), T 1/1 knit 10 rows, one row T 7/7. Transferred rib stitches to main bed and chained off. It dawned on me after all was said and done that I didn't engage the tuck brushes. Didn't seem to matter since I weighted it well and moved the weights up every 80 rows or so.

I think I'll make some charity shawls with this pattern. I certainly have enough yarn for several and I think they'd make a nice cover-up in air conditioning in the summer. Thanks, Diana!

Saturday, March 27, 2010

One cone gone!


Finally, I used up one cone of gray mystery yarn. This is how much I had left. Not even enough to get across the row. It stretched unbelievably far. You can see how skinny the yarn is. Lots of swatches, four 6+ foot scarves, one ring in a circle scarf and two hats. The hats and scarves are for charity. The mottled items are the gray mixed with another mystery egg shell colored yarn. Another giant cone I got I know not where. I didn't twist them like a person probably should, just ran them up through separate yarn feeders. Kind of cool I think, the randomness. Good feeling to use up yarn, but there are so many cones to go! My goal is to have just enough yarn to fill one yarn tree and no more. Have a lot of plastic bins to attend to still. Stay tuned!

OOps! Almost forgot to update my yards knit. Let's see. 1 yard x 604 rows = 604 for the scarf. 1 yard x 136 rows x 2 hats = 272 yards. Together: 876 yards. Not bad.

Monday, March 22, 2010

Ah...the sweet mysteries of machine knitting

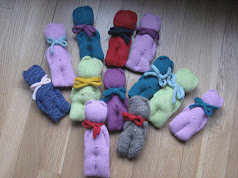
I really hate to admit it when something (knitting-wise) seems to be defeating me. I'm referring to Diana's Zig Zag Scarf.

http://diananatters.blogspot.com/2010/03/new-video-today-zigzag-racked-ribber.html

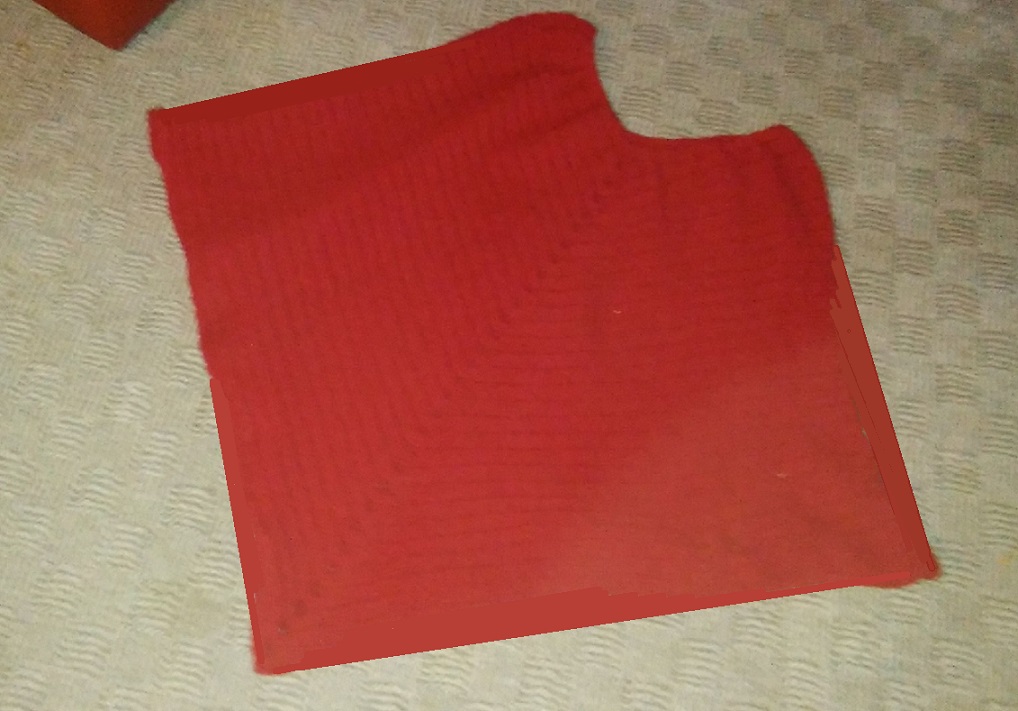
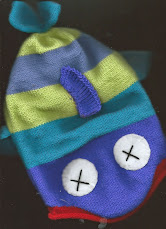
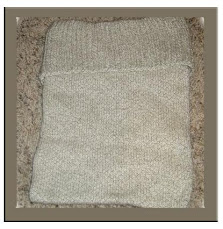
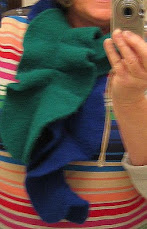
I was determined to make it. Wrote down the instructions while watching her video, made my own spread sheet---just like hers. The pattern, or something, didn't like my machine and my machine didn't like the pattern. At first I thought it was static, then I zigged when I was supposed to zag (see picture), then I thought my machine needed oiling and I tried about 12 different yarns and tensions. The picture below is actually the best of my disasters. The question mark indicates "What was I thinking?" The result is interesting, but not interesting enough to keep, if you know what I mean. Hmmm...maybe in the future I could go twice as many rows in one direction. But a person really should get the original pattern correct before going off on a tangent. Had a friend check out my directions to see if I was doing it right. I thought that this shouldn't be so hard. I felt like I was having a heart attack trying to move the carriage back and forth. I knew there would be no way I could do 600+ rows. And, Diana didn't seem to be having any trouble pushing the carriage in her demo. Not having any joy with anything I tried, I knit a few other things in the interim to check to make sure my machine really was ok.

Finally, I broke down and wrote to Diana and asked if she had any suggestions. I was kind of embarrassed because it's not exactly like I'm a novice knitter. She was most gracious and even said she loved a puzzle! She confirmed that I was racking in the correct sequence, so that was the main thing. I was apologetic about wasting her time, but she was non-plussed about it. What a sweet person!!! She's as nice as she sounds in her videos.

Yesterday then, after getting confirmation from the expert that it 
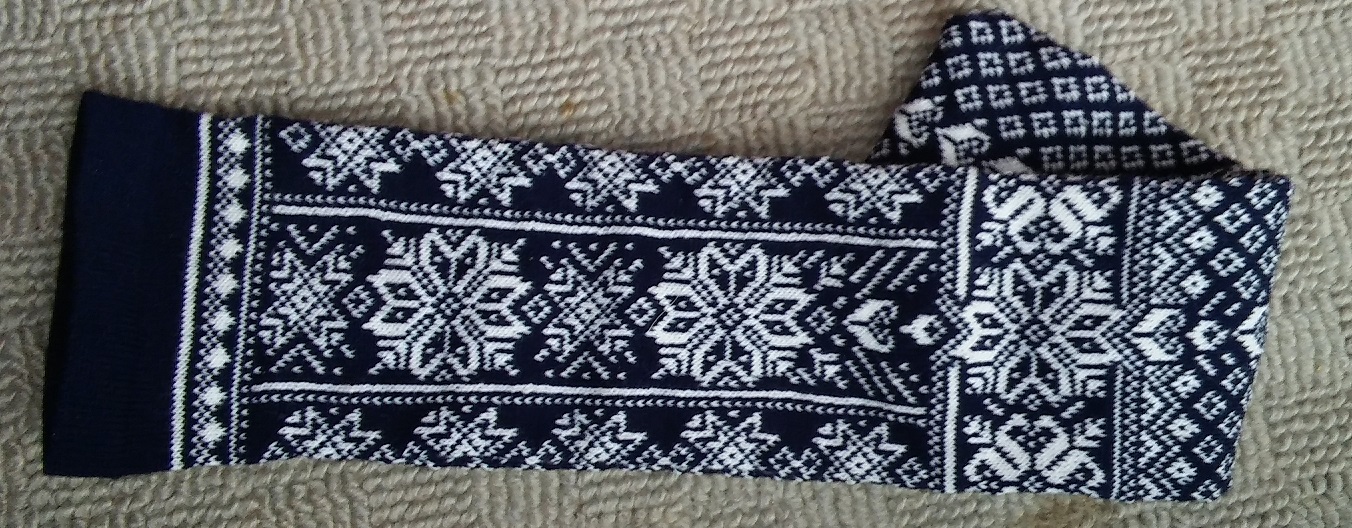
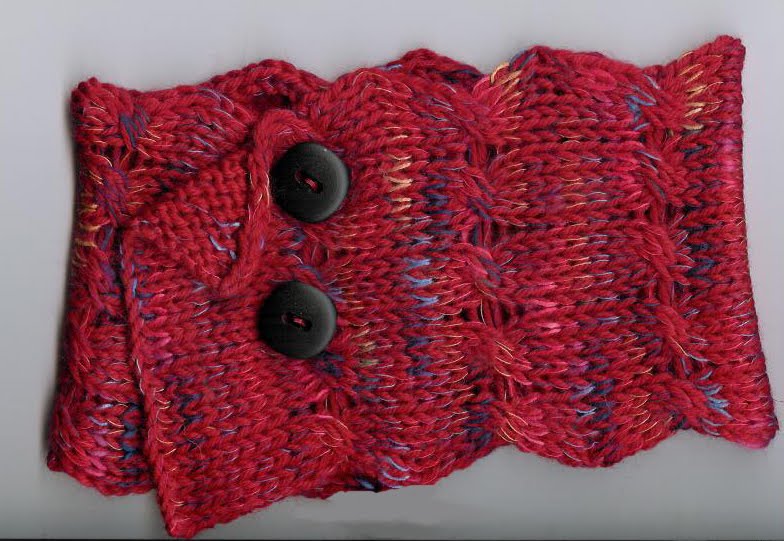
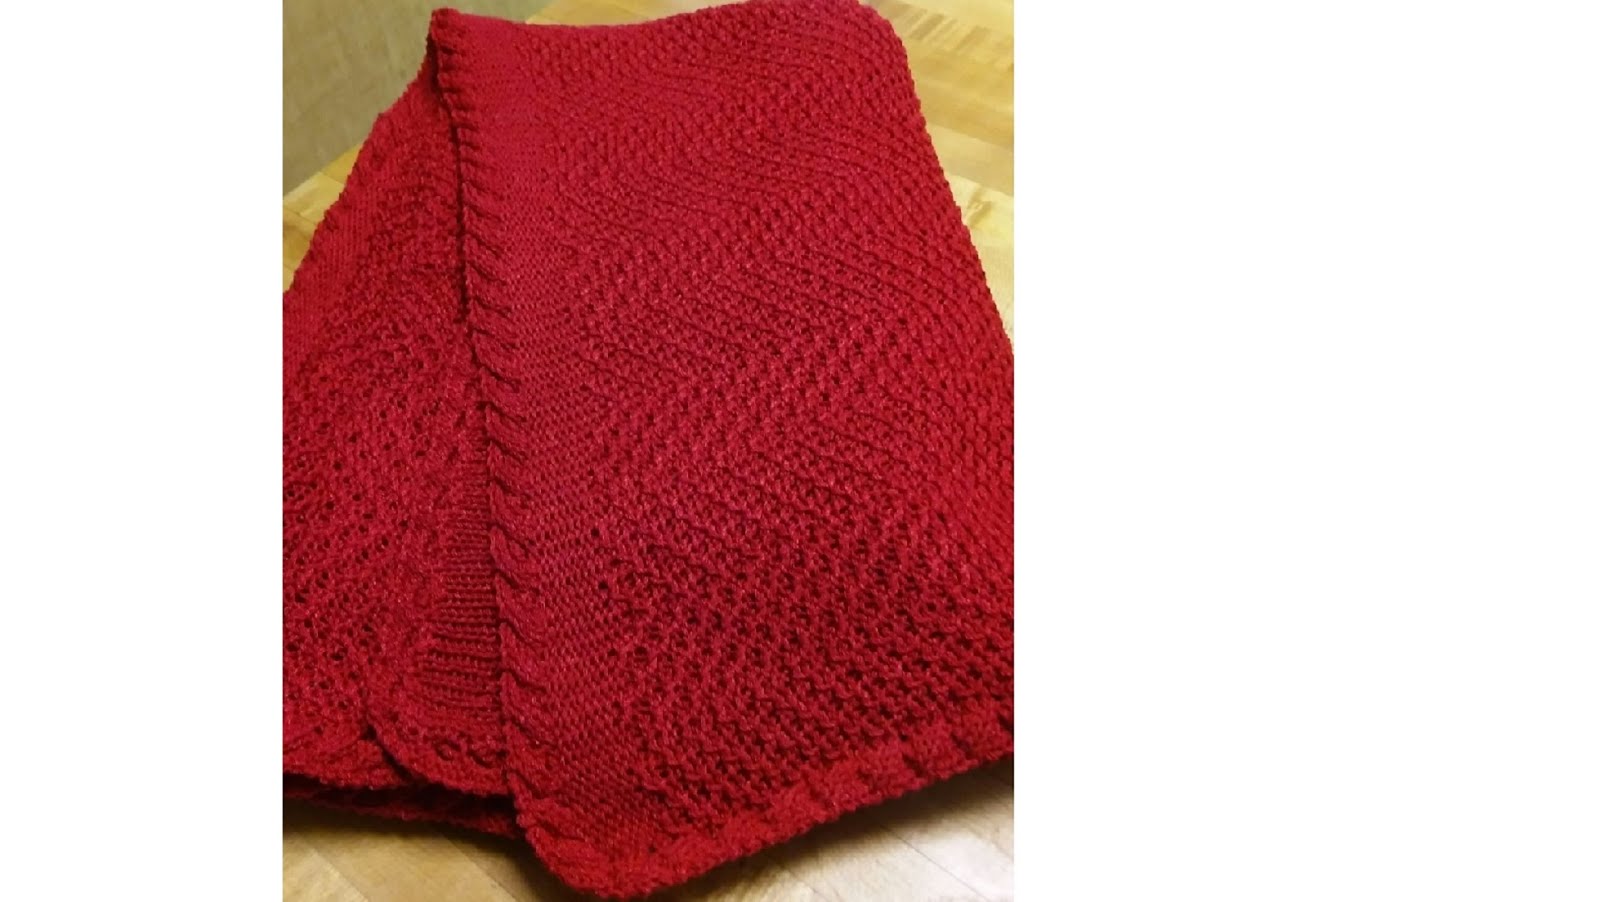
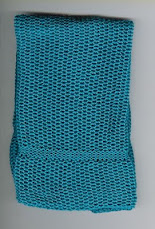
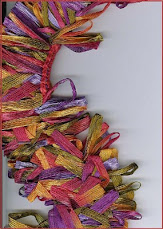
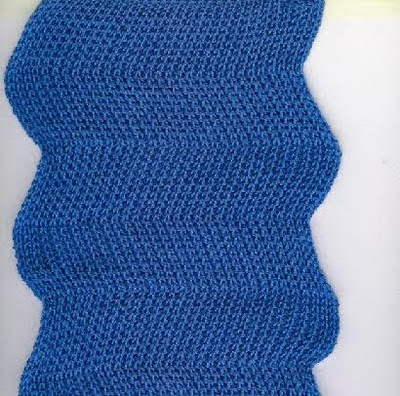
should be working, I thought I would try ONE MORE YARN. Finally, it worked. It's a beautiful pattern. Then the phone rang, I ran to answer it, came back, checked my cheat sheet and off I went again only to find out A FOOT LATER that I zagged when I was supposed to zig. O well, I found a yarn and a tension that my machine would cooperate with. This is my "good" swatch. (Not showing you my wrong turn...) For now, this was enough.

Don't let my experience discourage you. You probably will fly right through it.

The question for me remains, will I have the concentration to stick with it again and not make any mistakes for 6 long feet? There really is NO room for error. It's frustrating to not be able to see what you're doing until way past the point where an error may have occurred. And, there's no way I could rip back and find the right spot in the pattern. I have a knitting friend who probably could, (hi Ellen), but not me. This is one of those all or nothing deals. Do I get to count on my knit meter the 1,000 yards of yarn I used trying to get this right???? (I guess not.) And, finally, what the heck was I doing wrong on the previous 12 or so swatches? I'm suspecting tension, but don't know for absolute sure. I guess it will have to remain a mystery.

Saturday, March 20, 2010

Sometimes I get the urge...

to use my embroidery machine and make something. I suppose this title will put me at risk for search engines looking for porn. Won't they be disappointed! I have a tote bag that needs embellishing. Got this gorgeous pattern from the Embroidery Library. It's called, simply, "Garden Alphabet". There are two designs, one for the front of the bag and one for the back. Because the fabric is black, it's hard to see that it is indeed two pieces of fabric. The M is 5" tall and the single bud is about 3". I'll top stitch the squares on while the bag is opened at the seams. And then I'll add a lining with some handy pockets. That will be tomorrow's project.

I'm amazed at the artistic talent that goes into creating these embroidery designs. I think they are really yummy, even more beautiful in person.

Friday, March 19, 2010

Repurposing an old Norwegian Sweater

I knit this sweater a couple of years ago. I think the pattern is from Poetry in Stitches, by Solveig Hisdal. OR, it's a Dale of Norway sweater. I can't remember. I chose colors that were kind of "in your face" and didn't like them after all was said and done. The yarn was really expensive, though, so it has been one of those guilty little things sitting in my closet. So, yesterday I decided to chop it up and make some useful things out of it.

First, I used one cuff to make a hat for the American Girl doll. I just cut it off, unraveled a few rows to get the stitches all in a line, used the unraveled thread to sew up and gather, seam the side. Voila' it fits her perfectly.

Then I threw the sweater into the washing machine with some jeans to felt/full it. There were some long floats on the back side that I had hung up on the needles to make them shorter. During the felting process, the floats shrank and the fabric puckered a little. So, I just snipped them on the back side and was able to press out the knitting fairly smoothly. Hub and I have gotten into drinking tea again, so I thought it would be nice to have a tea cozy. This is the result. The handle of our hand thrown tea pot doesn't fold down, so it looks kind of crazy tall, but it works fine.

Finally, I made some pretty mitts for myself for next winter. I just traced my hand on a piece of paper and made a pattern that way. I was able to use the hem of the sweater as the cuff of the mitt. The insides were kind of messy, so I lined them with some cute fabric.

You might ask why I didn't center the flower on the back of the mitt. It was simply because I couldn't get two pieces of fabric wide enough if I centered. So, whatever. The embroidered flowers offset it a bit.

Guilt assuaged a little bit. I still have some sweater left. Will try to think of more things before the last of it gets tossed. The pewter buttons will be saved and used again, of course.

Tuesday, March 16, 2010

Fisherman's Rib Charity Scarf


The fisherman's rib stitch pattern is created by tucking on both beds on alternate rows. Both sides of the fabric look the same. Two strands of very thin yarn, lace weight(?- mystery yarn), threaded separately and joined at the carriage. They are two different shades of gray so makes a heathered look. Lots of weights used plus “7 wires” at both sides moved up every 30 rows. Circ cast on 70 stitches, T 0/0. Set to FishR: Left tuck on main carriage, right two levers up on rib carriage. T4/4, 700 rows. One row loosest T, transfer to mb, chain off. Finished size is 8” wide x 50” long. Soft and squishy, edges behave themselves. Nice and plain for a guy, I'm thinking.
That makes 4 long scarves with this cone of gray and probably can get 5 more out of it!!!

Monday, March 15, 2010

Going around in circles with a knitting machine


Another attempt at using up the yarn stash. Another gal (Vonkad on Ravelry) and I got inspired by seeing pictures of circle scarves at the same time. She is in the process of writing up her version. I think she is being a lot more precise than I was. I jumped in without a lot of thought and just went for it. Not sure yet how she joins her circles, but I just attached the previous circle every other row 5 times as I was knitting the next. Looking back, I'm thinking it isn't necessary to join them at all. The join is at the back of the neck and doesn't show anyway. Plus---a person could knit a variety of yarns and colors and mix and match circles to work with an outfit.

The scarves are squished under the lid of my scanner, so the pictures are not so elegant. You can see, though, that the strips just roll inward with the stockinette side turning out to be the public side. Advantages over knitting I cords are that it goes much more quickly and you can make the widths of your circles much wider.

This was seriously fun, mindless knitting! I cast on with waste yarn anywhere from 10 to 20 stitches, depending on the yarn and machine, and knit anywhere from 200 to 400 rows. Knit a few rows of waste yarn to start so it wouldn't unravel. Then changed to main yarn and knit the length I wanted it. Yup, against all the holy principles of machine knitting, I measured whilst on the machine. When I thought it was long enough I took it off on several rows of waste yarn. I kitchener stitched the ends together while it was in my lap and removed the waste yarn. Some of the circles were long enough to wrap twice around my neck. I tried to stagger the lengths. Random is good sometimes.

The red one has seven different yarns: cotton, wool, silk, slubby. Most of the strands were knit on the standard gauge. The colorful novelty yarn would only knit every other needle on the bulky. (Big and fat.) It resisted, but complied in the end. The gray/black/white/tan one has six circles with a variety of fiber contents also. It is fun to try to find a variety of coordinating yarns in the stash and use them up!!! Can't imagine knitting one of these by hand, but it's a perfect project for the machine. And, there aren't a lot of projects where you can mix and match machines, giving each their due.